Tuesday, July 31, 2012

Knitting and Crocheting

Last fall I saw an earwarmer/headband that I loved and I wanted to make it. The only problem was that it was crocheted and I didn't know how to crochet. I didn't know how to knit either, so I decided that I was going to learn. I went to Youtube and found a video that showed step-by-step how to make the earwarmer/headband that I wanted. This video was for crocheting. My best friend and I had already collected some yarn from a thrift store, so I got a hook from my Grandma and over a long car ride, I watched the video tutorial and made the headband. I love how it turned out!

Photo by Rachel Bair Photography
Since making that headband, my crocheting has improved and I have also learned how to knit!

I have made some little shoes: 


A pair of baby girl flower sandals:


and a hat using another video tutorial (sorry, no picture)

I have recently been working on making a lot of headbands and am excited to sell them! 

As for knitting, I was taught by a woman from my hometown and she did an excellent job. I have only knitted one thing and that was the scarf that I started when I learned. It is made of a very soft yarn, so it is very comfortable. 


Luckily, I improved from when I started the scarf to when I finished. I was more careful and understood better how stitches can be easily dropped and added, which is what happened in the beginning (the left hand side).


I enjoy crocheting and knitting and find them both very relaxing. I appreciate the people who have put time into helping me learn because I know these are skills that I will use forever. 

~K.A.N.

Monday, July 30, 2012

Old Windows

I love old windows and I believe with an idea and a little bit of work they can be made into something great. 
For example, for Christmas a couple of years ago, my mom made an old window into a message board for Nathan and I. We love it! We use it for making lists, for writing notes, and of course, for messages. 

The house I grew up in was built in 1914. That is pretty old. A lot of updating was needed when my family moved into it and one of those updates was windows. My first old window project is a window from that house, so I love it even more. 

The window has nine panes. I finally came up with an idea that I loved...a menu board. One pane to say Menu, one for each day of the week, and one for a grocery list! Perfect.

The window was old with paint wearing off and some of the glass broken. I was planning on just replacing those panes that were broken but the grout holding the glass in was very old and was doing its job well. I ended up breaking even more of the glass panes, so I decided I would just replace all of the glass. Nathan broke the glass for me and we took all of it out of the window. Now, it was just the frame.

On the left is the front of the window and on the right is the back.


After the glass was out, I hoped it would be easier to get rid of the grout, but just continued to break things I didn't want to...like the wood that was there to help hold the glass in. I decided it would be easiest to replace that too! After taking that wood off, I filled the holes I had made and sanded the front of the window.


I then stripped the paint off and sanded the whole frame again. After that, I took the frame to my Grandpa's shop where my husband and grandpa were very helpful with the next few steps: replacing the wood to help hold the glass in and cutting the glass. The wood was cut to size and put in place using a nail gun. I used glass from frames bought at a thrift store for between 15 and 75 cents each. Those glass pieces were cut down to the right size and set in the frame to make sure they fit.


Good as gold! I took the glass out and spray painted the frame black. I then used glazier points and hot glue to secure the glass in place in the frame. 

I asked a family friend for help with the vinyl cutting and she did an excellent job. I used painter's tape to make sure the words would go on straight. 


Then, very carefully, the vinyl was attached to the glass, the hangers put on the back and the new menu board was hung up! I just use a dry erase marker to write and it comes off perfectly. It is definitely one of my favorite projects yet.


~K.A.N.

Wednesday, July 25, 2012

Wreath

A couple of months ago I was looking online at a blog (which I can't find anymore!) and saw a wreath that the author had made. I absolutely loved it! Using her thrifty skills, she was able to make that wreath for just over $10. For a super cute decoration, that is pretty great, so I decided to make one also. 

Our last name starts with an N so that is the letter I chose to use. 


In total, this wreath ended up costing me less than $2.75!! Now that is a deal.

The actual wreath was bought from the thrift store and cost me $1 (I believe you can find them at some dollar stores as well). I also got the frame at that same thrift store for $0.50 and painted it white.  

I then went to Micheal's to get the rest of the supplies. The wooden letters there cost about $4 and although that is not a lot, I have an amazing Grandpa who I knew could make me one for free. Looking at the options for decorative things for the size of the wreath, those were also more than I wanted to spend. 

So, it turns out the only thing I did get at Micheal's was the paper to cover the letter. It was on sale and cost me $0.16. 

I called my grandpa and asked if he could cut out a letter N for me. He agreed as long as I made a pattern for him to follow. I drew a pattern, took it to him, and my N was free and perfect size for my frame. While I was there, my grandma also gave me plenty of rafia to use for tying everything together.  

The only thing left was the decoration for the side of the wreath. I didn't want to spend a lot, so I decided to give the dollar store a try. To my excitement they had several options! I picked the set I liked best, took it home and finished my wreath! It hangs outside our front door and I love it. 

~K.A.N.

Wednesday, July 18, 2012

ipod Armband

This weekend is the race I have been training for. I am doing the Ragnar Relay! It is going to be long and tiring, but I can't wait to join my team and make some great memories. I'm really looking forward to it.

While I run, I like to listen to music; all kinds of music. Up until last summer, I would just carry my ipod in my hand while I ran, but this made it so I didn't move my arm as much as I would have liked. With all the moving of the wires, it also made my headphones fall out of my ears too often.

This was just a hassle, so I made a simple armband. A VERY simple armband. It was a piece of elastic and a piece of fabric. I hand stitched (I didn't have a sewing machine yet) the fabric into a pocket the size of my ipod and stitched that onto the elastic which was just smaller than the circumference of my arm.  Although simple, this little armband worked great! I loved it and it was just perfect for what I needed. 

It lasted for the year, but recently started to tear. The fabric I used was a very thin cotton and all the jostling while running made some nice holes where the stitching held the elastic on. The other day I ran the longest run yet. The elastic was fine for shorter runs, but it wore on my skin during this long run.This handy little armband held up for that run, but it was time to retire it. 

With my race this weekend, I had to make a new one. I looked at the different armbands online, but didn't have the right materials to make any of them, so I came up with my own design, drew a pattern, and made my new ipod armband. 


I used the same elastic as before, but rather than elastic alone, I made a casing for it with some soft flannel. No more scrapes from that elastic! I added the pocket to the front, allowing the circle to show so that I can easily change volume, skip, or stop a song when I need to. 

I took it on my run this morning and it worked great! I am so excited for my race!

~K.A.N.

Tuesday, July 17, 2012

Tie a Quilt

At church this week there were a few baby quilts that had been made for charity and just needed to be tied. I have never tied a quilt before, but I thought I would try. This was the quilt I picked. I love the fabric!


I already had everything I needed:  a yarn needle and matching yarn. I am currently away for the summer, so I didn't have many color options for yarn...I apologize if the white is hard to see. 


First step was to thread the needle. I did a double strand because the yarn I used was not very thick. I pulled the yarn through the eye of the needle just a few inches on one side. At first I used a very long piece of yarn to do several stitches, but found it easier later to just make the yarn to be just longer than the width of the quilt and do one row of stitches at a time. 


I then decided on the spacing of the ties. To be honest, I didn't measure; I just eye-balled it and used buttons to keep the spacing even. 


Using my yarn needle, I went down through the top layer, batting, and backing, over just slightly, and back up through all three layers. 


I pulled my yarn all the way through until there were just a few inches left on the right side of the stitch. Without cutting I moved to the next stitch (where the next button was placed) and did the same, pulling the yarn to fit the distance between without being too tight. This was repeated until I ran out of yarn. 


Above, I have done three full rows of stitches. As mentioned above, I later found it was easier for me to do one row at a time, but you can do as much as you would like.

Next, I cut the yarn between the stitches. This will leave you with yarn going in one side of the stitch and out the other. 


The last step is to tie and cut the yarn. I did a double knot to keep it nice and secure, then pulled it out and trimmed it to a length of just a couple inches off the quilt. 


On the front, you will have several little ties of yarn and on the back, there will be small dots of yarn.


And that's it! A finished tied baby quilt!


~K.A.N.


Monday, July 16, 2012

The Herbfarm


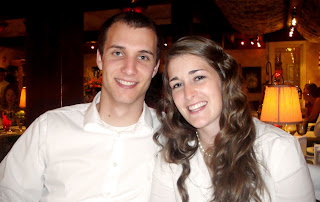
This is one incredible place...and not only because this is where Nathan proposed to me. This is a place to relax, be treated like royalty, and enjoy food for several hours. The Herbfarm is a sweet little restaurant located in Woodinville, WA. With the help of his dad, Nathan arranged to propose to me here, and thanks to his dad one more time, we were able to attend this great place again last weekend. What a joy that was! 


At the Herbfarm, when we arrived, we were greeted warmly and offered a glass of soda they had made. It was very delicious. We were told to look around. Both times we have been there, we have gone up to the little library they have that overlooks the dining area. It is so pleasant. Around 6:45, the owner's wife takes us on the garden tour where we get to taste, smell, and see several herbs that they will be using in the nine courses throughout the evening. 


When that is over, we are taken to our table which is set for us with a neatly folded napkin containing the menu for the night. Our menu theme was Dinner with Dinosaur's: A Fantasia of Modern Fowl. 


A waiter then comes to our table to pour the first glass. Drinks are carefully selected to match each course of the evening. We are then served our first course. Following the first course, we are introduced to all of the staff and given an explanation of the courses we will be served throughout the evening. 


With that done, the rest of the evening is a conglomeration of food, drink, social interactions, music, and relaxation. 


Every course was exquisite. It finished with a nice warm cup of mint chocolate herbal tea and some sweet little treats. By the end of the night we were full, tired, and ready for a good night of sleep. 


~K.A.N.


Dress Alteration

I love dresses.
I was recently at old navy looking for some new running clothes and they had a ton of dresses on sale! I couldn't resist...I tried on about ten and bought two. The only catch: they were both too big. When I find something like that though it just gives me the opportunity for a new craft! I think, "I can fix that."


Size: XXL, but for only $6.97 this was going to be a cute dress!
Starting out, the neckline was WAY too big. As for the sleeves...there weren't really any. It is just the style of the dress. I didn't mind too much, but Nathan didn't like it one bit, so I decided to fix those too. 
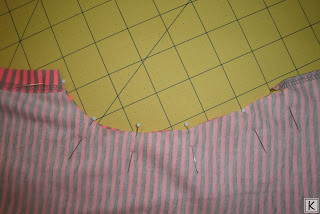
I first put the dress on and pinned the neckline to be the size I wanted. 


Carefully, I took the dress off and aligned the pins on either side so that the neck was even. I then cut straight along the top on both sides. Be careful when you're cutting through several layers that all layers are flat. If there is a crease, you will end up with a strange cut that you will have to compromise for later. (yes that happened to me)
The cut looked a little strange having the shoulder line go up rather than down, but I went with it.


Flipping the dress inside out, I pinned both sides, making sure to keep it even. As you can see, my cuts are far from perfect, but as long as you pin and sew in the correct places, it should be okay right? 


Sewing the neckline and flipping right side out...a new, much better fit neckline! Hooray!


I put the dress back on, making sure the neck fit right...and it did, so onto the sleeves. I brought my arms up and pinned where the sleeves would be fitted, but not tight. With such a large size dress, I had a lot of material to work with, so that was a plus. I carefully took the dress off and measured to make sure the sleeve sizes would be even on both sides. For me, that was 2.5 inches from the bottom of the opening. 


Next, I made a cut that I thought would make a good sleeve, but wouldn't destroy the look of the dress. Having a dress that was loose, I decided the sleeves would look best to be taken in just a little bit at the end.  I made a very gradual curve that led into the side of the dress to avoid any extra bumps. 


To make the same cut on the other side, I laid the piece I had cut on top and followed the curve. 


I now had the same cut on both sides. I turned my dress inside out and pinned both sides. 


I then sewed along the curve to make the sleeve! I put the dress on; the neckline was good, but the sleeves were just okay. There was an odd bump from where the shoulder line was sewn. I took the bump in a little bit, but it still didn't look quite right. I then searched through my button stash and found two gray buttons to match. I folded the bottom of the sleeves over and attached the button to hold it down...much better.


A new summer dress to wear!


~K.A.N.


Thursday, July 12, 2012

Almost Two Years Later...

Nathan and I were married August 14, 2010 in the Columbia River, WA temple. He is and always will be my best friend. A few weeks ago we had the opportunity to visit that temple again. It is such an incredible place...beautiful inside and out. After our session I was able to take some pictures and the overcast weather was just perfect for that. 


I love the temple and I love my husband!

~K.A.N.

The Jean Quilt

This was by far my biggest, most frustrating, and most exciting project I have completed yet. This was also the first idea of my craft adventures...so what I consider to be 'the one that started it all'. 


I had the idea to make a jean quilt because I had a couple of pairs of jeans that just didn't fit right anymore, so why not recycle and make something out of them? After deciding on square sizes, the size of quilt I wanted and collecting several pairs of jeans, I started cutting...and I continued cutting...for a long time. Finally, I had enough squares. 


I was so excited, but also now realized what a project I had gotten myself into. Oh boy. The next step was to lay out the squares in an arrangement I liked. All I wanted was a good spread of the different shades and the small squares spread out relatively even.


This looked good to me! Now...to piece this monster together. I started with the small squares in groups of four: sew two together, sew two together, sew the two sets of two together to make a large square made up of four small squares. 

(first small square complete)

When those were complete, I began with the rows, sewing the vertical sides of the squares together. This gave me 14 rows total, which I sewed together. I then added belt buckles, labels and other decorative things to add some dimension. This finished the top of the quilt! At this point I felt like I had done so much and yet I had so much left to do!

With the top of the quilt complete, I was ready to put it together with the batting and backing. The batting was graciously bought by my grandma and the backing was the flat sheet from a sheet set. Buying the sheet set was cheaper than buying that much fabric and was also all in one piece. It also gave us a matching fitted sheet and two pillowcases! That is a steel. My wonderful husband helped unpick the edges of the sheet and I ironed those down. The backing, batting and top of the quilt were laid down flat and pinned all over to hold it together. 


Now, to quilt it. I had decided to just quilt in the ditch between all the squares, both directions. This was the hardest, most frustrating job of the entire quilt. The first time I tried was a complete fail and I was so frustrated that I didn't even want to do any more. I left the room. After a long time, Nathan came and found me to tell me that he had unpicked it for me (he is so good), it was going to be put away for that day, but as long as I relaxed, I would finish it. He was right. With enough time, some muscle (jean quilts are very heavy), and lots of patience, I finished the quilting. Using my new rotary set, I was able to give the edges a nice clean cut. 


The only step left was the binding. I used some navy blue cotton fabric that I already had and followed the steps given here to bind my quilt. Finally, finally, finally it was finished. 


Joy and relief flooded my whole body. I was so happy to be done and so excited about how it turned out! 


~K.A.N.