Thursday, December 13, 2012

Cousins

A while ago, I was able to see my cousin! She lives in Canada and I don't get to see her very often, so I do love it when she comes to visit. She really is superwoman! She has two adorable little girls who are so great. I loved spending time with them and I just can't wait to see them again. 

While they were visiting, I loved taking pictures of them...they are just too cute not to. Don't you agree? :)


This little one is quite the talker and there is never a dull moment.


The younger girl was a little more shy and took some time, but finally warmed up to us. 


We spent this day up there and were also able to go up for Halloween! Did I mention my cousin is a superwoman? I wasn't kidding...the little ones were dressed up, but she just went as herself with her ladybug and snow bunny. 


It was so much fun and I am truly grateful for them. I can't wait to see them again.


Wednesday, December 12, 2012

Over a MONTH!!

I can hardly believe it's been over a month since my last post! I knew it had been a while, but I didn't think it had been that long! Wow, I guess I've been kind of busy. 

But guess what? That is just about over. Woo hoo! I just have one take-home final to finish, then I am home free for over 3 weeks. This is one thing that I love about college...we get awesome breaks; at least as an undergrad. It really is the best. 

Well, since it has been so long, I just decided to show you a quick post of the outfit that I mad for my best friend's little guy. He is over 2 months old now and just a little cutie. He still doesn't quite fit into this outfit, but it is definitely one of my favorite gifts I have ever made. 

The first thing I made was the bow-tie onesie. It was pretty simple and I love the bow tie! I made the bow tie out of some navy blue cotton and found the onesie at a yard sale for 25 cents! I just attached the bow tie directly onto the onesie.


After the top was made, I worked on the bottoms. I found some boy slacks (size 12, I think) at a thrift store for a couple of dollars and just used the bottom of the legs to make these little pants. I drew out a pattern to be 6 months (the same size as the onesie), put the legs together, and made a simple elastic waist. 


The last thing I made was the shoes. I technically made them very first, but they didn't turn out quite right, so this second pair was made after the above outfit was made. They turned out just right and I adore them!


The top flap is held down by a little square piece of velcro. I sewed the button on last to cover most of the seam from the velcro underneath. 


Like I said, this little outfit is one of my favorite gifts yet!


I can't wait to see him wear it. 

~K.A.N.

Tuesday, November 6, 2012

Knotted Headbands

I saw a picture of these headbands on pinterest and just loved the knot! I then found a tutorial of how to do it and made a bunch of them because they are just so easy!


I did this with a couple different fabrics...literally it takes 5 minutes to make one!
You will need: knit fabric (I used old t-shirts), something to cut with, and a hot glue gun.

First cut strips to the width you like. I did several different widths to see what I liked best, just make sure you have two of the same width.


Take two strips of the same width and pull on the ends to stretch them out. This will make them roll in.

Take the first strip and lay it in a shape as shown below, I will call it the ribbon strip. **Make sure the ends are overlapping as shown with the right over the left!


Place the second strip in a U-shape over the first strip. NOTE: The U-shape strip from here on should have the right side UNDER the right end of the ribbon strip.


Take the left side of the U-shape strip and lay it under the bottom strip as shown. 


Take the right strip and thread it through as shown: over the first, under the second, and out over the third. Make sense?


Now, pull evenly on the two ends at each side, adjusting as needed.


Pull all the way tight to make your knot!


Cut the ends to make them straight.


Cut a small rectangle, put the ends together and hot glue to hold in place. 


And that's it. Go make a bunch, wear them and give them to friends! 
Here is a picture of a sweet little one with a headband I made. Such a little cutie!


~K.A.N.

Monday, November 5, 2012

Fixing Jeans

I had two pairs of jeans that needed some fixing, so I'm going to show you what I did to both in this post. 

The first pair had a rip which I didn't notice and wore to school one day...that's embarrassing!


The second pair had back pockets that I didn't like. I would always try to wear long shirts to cover the pockets because I love how the jeans fit. Instead of always trying to find long shirts to wear, I decided to replace the back pockets.


I pulled out my box of extra jeans and found a pair with pockets that closely resembled the color of the jeans that needed new pockets.


 The first step was to unpick the pockets from the new pair of jeans. I did one pocket and laid it over the old pockets to make sure they fit and didn't look strange. 


I decided they were good and unpicked the rest of the pockets. 


I then pinned the new pockets in place...


And sewed them right down. I used a jean needle, sturdy thread, and went slow, making sure to get the edges nice and secure. And that was it...I now have a "new" pair of jeans!


As for the jeans with the rip, I decided to just use a small piece of jean to just patch up the hole. 


I cut a piece out from another pair of jeans, just bigger than the rip and following the same general shape.


I laid it down to make sure it was the right size. You don't want it too big, but it's better to be a little big than too small!


Carefully, I pinned the piece in place.


Then, I just zig-zag stiched all the way around the fabric! From the outside of the jeans, you can barely even see the stitching and with the fabric secured in place, the rip won't be moving around or getting any bigger. 


~K.A.N.

Friday, October 19, 2012

Crochet Cocoon/Swaddler

Recently, I visited a friend with a new baby girl. She had her little one wrapped in a little cocoon/swaddler that was crocheted. I loved the idea, so with my best friend due in just a few days, I decided to make one. 

Mine is a simple double crochet stitch with multicolored yarn for the main body and a black ring for the top  edge. 


It fits him just great!


Perfect for a sleepy baby. 


There are so many variations that these can be made into and I am excited to make more!

~K.A.N.

Thursday, October 18, 2012

Onesies into T-shirts

A couple of weeks ago, my aunt asked if I have a sewing machine. When I said yes she asked if I could do a project for her. She explained that her daughter, who is 2 and now starting to potty train, has a lot of cute onesies, but those snaps just don't work with potty training. She asked if I could make them into shirts for her, and I said yes. 

A couple of days later, the package arrived in the mail with five long sleeve and five short sleeve onesies.


She also sent a shirt for the length she was looking for.


When I laid the first onesie down with the Americana shirt on top, I realized that even with cutting the onsies right at the hips, there would be no room to hem.


I made a cut straight across, as low as I could and decided I would work from there.


With the bottom cut off, I thought about the different ways I could fix/hem the shirt. I had the idea to just use another type of fabric to make a hem, when I realized I had all the fabric from the bottom part of the onesie that I had just cut off! It was the same fabric, so it would of course work perfectly. 
I cut along the dotted line (below) to use the edge of the bottom of the onesie as a hem for the shirt.


Laying those pieces straight out, there was plenty to work with! 


I cut the pieces about 1 inch bigger than the width of the shirt and pinned them together, right sides in.


Using a 1/2 inch seam allowance, I sewed the pieces together on both ends, making sure to stitch back and forth a couple of times. I then turned this new "hem" right-side-out and starting with matching the seams, I pinned it to the bottom of the shirt.


Using my longest stitch possible, I sewed a straight line all the way around, attaching the hem to the bottom of the shirt...all finished!


I repeated this process for all the shirts and was quite pleased with how they turned out. 


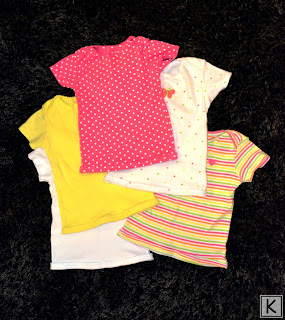
10 shirts ready for potty training days. 

~K.A.N.